When you wear a plate carrier that’s fitted correctly, you maximize protection for your vital organs, maintain a full range of motion, and stay comfortable during intense movement. Conversely, leaving the plate carrier too loose or poorly adjusted can compromise coverage and distract you at critical moments.
This guide provides a clear plate carrier fit guide, showing you step‑by‑step how to select the right plate size, adjust shoulder straps and cummerbunds, and test mobility.
Selecting the Right Plate and Carrier Size
A plate carrier only protects what it covers. The goal is to shield the vital organs, not weigh you down or limit movement. Start by measuring the distance between your collarbone and your navel. Most adults fit in 10x12. A small shift in coverage can make a difference in a real situation.
The carrier should hold the plate firmly without bouncing. That’s where fit matters. Carrier sizes vary, but most adjust to fit a range. The design should allow tight strap placement and full plate seating without gaps.
Make sure it fits close to the body. Side straps and cummerbunds should draw the front and back panels tight but not restrict breathing.
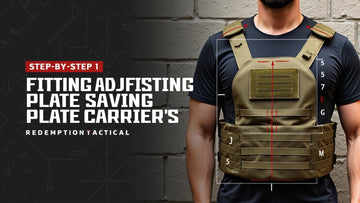
Step‑by‑Step Fitting Process
Getting the plate size right is only half the equation. The other half is how it fits your body. Here’s a clear, step-by-step guide to adjusting your plate carrier for performance and protection.
1. Strip the carrier down.
Before adjusting anything, remove all pouches and gear. This helps the carrier to settle properly against your torso without extra weight throwing off the balance.
2. Fit the front plate.
Hold the front plate against your chest. The top edge should sit about two finger widths below the collarbone. This protects your heart, lungs, and major vessels without interfering with head movement or cheek welding. The bottom should end above the navel.
3. Adjust the shoulder straps.
Connect the shoulder straps with the front plate positioned properly. Shorten or lengthen the straps until the plate sits flat and even. Straps should rest snug on your shoulders but not pinch or pull.
4. Attach the rear plate.
Now line up the back plate to match the height of the front one. This keeps your spine protected and avoids imbalance. Use shoulder straps to bring it to a level. If the back plate rides higher or lower, adjust again.
5. Tighten the cummerbund or side straps.
Wrap the cummerbund around your torso. It should pull the front and rear plates firmly against your body. You want tight contact with no bounce when moving, but not so tight that it restricts breathing.
6. Check for freedom of movement.
Raise your arms overhead, reach across your body, twist at the waist, crouch, and kneel. If the carrier limits these movements, back off the straps slightly or shift the plates. Full range of motion is non-negotiable.
7. Final pass.
Once everything is in place, walk, squat, jog. Make final micro-adjustments until it all feels locked in and mobile.
Testing Fit and Mobility
Fittings are not finished until you test them. Static adjustment has only gone so far. Now it’s time to move.
1. Start with range of motion.
Lift your arms above your head. Cross them across your chest. Reach behind your back. If the carrier pulls, pinches, or rides up, loosen the shoulder straps slightly. Your movements should feel natural.
2. Do a breathing check.
Take a deep breath. You should be able to expand your chest fully. If the cummerbund restricts expansion or presses into your ribs, you’ve gone too tight. Re-adjust until you can breathe deep and easily under stress.
3. Test under pressure.
Run in place, drop to a kneel, do five burpees, then reload a magazine. You’re simulating field activity. Nothing extreme, just enough to shake loose a poor fit. If the plates bounce or the straps loosen, make corrections.
A good fit will stay tight, centered, and balanced no matter how you move.
Loadout & MOLLE Setup
Once your carrier fits right, it’s time to build it out. The way you load your carrier effects not just access but also balance and fatigue.
1. Balance matters.
Start with the weight distribution. Keep heavy gear—spare mags, med kits—centered and low. Avoid packing too much on either side or the rear. Imbalance leads to tilt and discomfort during long wear.
2. Accessibility comes next.
Place mission-critical gear where your hands naturally reach. Primary mags up front, tourniquet near center, radio where it won’t snag. Avoid clutter. Every item should serve a purpose.
3. Use MOLLE efficiently.
MOLLE webbing lets you customize your layout. But more isn’t always better. Stick to what you need. Too much gear creates bulk, catches on obstacles, and makes your profile wider.
4. No noise, no shift.
Secure pouches so they don’t flap or rattle. A silent kit is a smart kit. Movement should be smooth and quiet, even when running or prone to rain.
Conclusion
Properly fitting and adjusting your plate carrier is critical for ensuring maximum protection, comfort, and mobility in any situation. Taking the time to follow each step, from selecting the right size to fine-tuning straps and positioning plates, can make all the difference when every second counts.
At Redemption Tactical, we provide high-quality plate carriers and tactical gear that combine battle-proven protection with real-world affordability. Trusted by law enforcement professionals across the country and tested in combat zones worldwide, our gear is built to save lives and stand up to the toughest conditions.
Get the protection you can trust, shop from us now!
FAQs (Frequently Asked Questions)
Q: How tight should my plate carrier be?
A: Tight enough to stay in place during sprinting, crawling, or drills, without limiting breath or mobility.
Q: Where should the front plate sit?
A: Roughly two fingers below your collarbone. It should cover the heart and major vessels without pressing into the throat.
Q: Do I need side plates?
A: It depends on your threat profile and role. They add coverage but also weight and bulk. Prioritize movement if speed is essential.
Q: What size plates do I need?
Measure from collarbone to navel and nipple to nipple. Most adults wear 10x12. Don’t size based on T-shirt or jacket size.
Q: Can I wear a plate carrier under a jacket?
A: Yes, but test for fit and draw access. Make sure mobility is compromised. Concealed setups require more refinement.


