Building an effective plate carrier + helmet + backpack combo means striking the perfect balance of protection, mobility, and load efficiency. At its core, this kit seamlessly integrates your ballistic protection (plate carrier), head shielding (tactical helmet), and supply carriage (backpack) for a mission-ready loadout. A well-chosen tactical loadout ensures your gear doesn’t hinder movement or fatigue you—heavy modular systems undermine agility.
Start with a plate carrier setup that fits snugly and offers MOLLE compatibility for accessory attachment. Pair it with a helmet retention system designed for comfort and low‑profile operation. Then select a backpack integration system—ideally with harness straps that ride above the carrier—enhancing weight distribution and reducing shoulder strain.
The result: a streamlined, adaptable loadout perfect for any operation. This ideal tactical kit delivers balanced protection, comfort, and performance—freeing you to focus on the mission, not your gear.
How to Choose the Right Plate Carrier ?
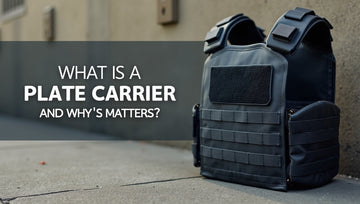
The plate carrier is the foundation. Choose one that fits your torso without limiting movement. A tight, high ride is critical. The front plate should rest just below your collarbone. If it’s too low, your vitals are exposed.
Look for strong stitching and secure cummerbunds. Modular systems with laser-cut MOLLE offer more flexibility without adding bulk. A carrier with quick-release buckles can save time during emergencies or medical pulls.
Consider your mission. Do you need rifle-rated plates or lightweight soft armor? Rifle plates increase weight but offer more protection. Soft armor is lighter and more flexible. Both can work—depending on your threat level.
Internal padding helps with airflow and comfort during long wear. Adjustable shoulders keep the load high and balanced.
We’ve used a range of carriers over the years—some in active duty zones. Simpler designs tend to last longer. Less to fail. That’s what we look for when sourcing gear for Redemption Tactical.
Keep your gear close to your center mass. Avoid overloading the front panel. Your plate carrier setup should allow you to prone, kneel, or sprint without gear slapping your legs or chin.
The right plate carrier doesn’t just carry armor. It supports your entire tactical loadout. Make that choice count.
Selecting a Tactical Helmet That Complements Your Carrier
A tactical helmet protects more than your skull. It mounts lights, comms, and NVGs—all of which interact with your carrier.
Avoid heavy helmets that tilt forward or back. Look for options with solid retention systems—ratchet knobs or dial fit bands. Comfort is critical. If it gives you a headache in five minutes, it won’t work in the field.
Match your helmet’s profile with your plate carrier setup. High-cut designs pair better with headsets. They also offer better mobility when turning or laying prone.
Fast-attach rails are useful for modular mounting. Flashlights, strobes, or side cameras can be added or removed on the fly.
We’ve worn helmets during long stints and dynamic entries. Weight balance is everything. It’s not about the brand. It’s about how it rides and performs.
Consider adding helmet pads or upgrading liners for comfort. Over time, you’ll want to swap and adjust your configuration. Start with a stable shell that doesn’t need babying.
If you’re going to wear it for hours, test it properly. Do jumping jacks, look side-to-side fast, and lie down. Your helmet should move with you—not against you.
Picking the Right Backpack for Plate Carrier Integration
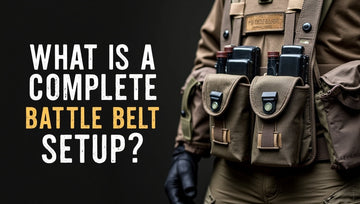
Your backpack can make or break your full kit. The wrong one fights your carrier. The right one disappears on your back.
Choose a low-profile pack that rides high—just above your plate. Compression straps are key. They keep contents tight, so nothing flops when you move.
Avoid massive bags unless you're rucking. Mid-size day packs or assault packs are ideal. Look for hydration compatibility, internal frame support, and smart access points.
Strap configuration matters. Padded straps over your plate carrier can cause bulk. Instead, consider clip-on or zip-on systems that integrate directly with the carrier.
Backpacks with detachable shoulder straps allow better fit over carriers. Some designs use slick rear panels or hook-and-loop for faster mounting. If your mission changes often, modularity matters.
We've tested integration under pressure—climbing, crawling, sprinting. The packs that work best are simple, tough, and ride clean. Weight stays tight to the spine.
Don’t fill every pocket just because you can. Pack only what you need. Keep it balanced and streamlined. You’ll feel it within 10 minutes of movement.
Perfecting Fit – Integrating Carrier, Helmet & Pack
You’ve got the three parts—now make them work together. Integration is where most loadouts fail.
Start with the plate carrier. Adjust ride height first. Shoulders should sit flat, not angled up. Secure the cummerbund evenly across your lower ribs. The carrier should not shift when you squat, kneel, or roll.
Now, add the helmet. Fasten it and shake your head. If it wobbles or slides, readjust the straps. Then move your head quickly in every direction. If the carrier collar catches your helmet, lower your rear plate slightly or trim any raised edges.
Add the backpack last. If it presses into your helmet when you turn, it’s too tall. If shoulder straps interfere with carrier shoulder pads, consider removing them and using a mounting plate or harness adapter.
Run a dry drill. Crawl. Sprint. Jump. Drop prone. Listen for bounce or slop. A good plate carrier + helmet + backpack combo stays quiet. Clean movement. No drag.
Use a mirror or recording to see what catches. We've had gear snag in doorways or block head movement—not ideal under fire or during entries.
Check for pinch points under arms or shoulders. Layering gets tricky when gear overlaps poorly. Make adjustments before the mission, not during.
One final check: Can you draw your weapon cleanly? Can you reach your hydration line? Can you remove your pack solo? These aren't bonuses. They're required.
Done right, the combo should move as one system. Not three pieces stacked. Train like it’s real. Because sometimes, it is.
Essential Accessories & Setup Tips
Accessories add capability—but also risk. Too much gear gets in the way.
Focus on mission-first attachments:
-
Admin pouch for maps, pens, tools
-
IFAK on your weak-side lower panel
-
Mag carriers high and centered
-
Radio pouch side-mounted or chest-worn
-
Hydration line over the shoulder, clipped to your rig
Avoid side-bulk. Side pouches cause drag and limit motion in close quarters.
Stick to three core loadouts:
-
CQB: Light and tight
-
Patrol: Mid-weight with comms
-
Ruck/extended: Add sustainment pouches and hydration bladder
Helmet accessories should serve a purpose. NVGs, strobes, and light mounts are common. Avoid stacking too many gadgets. Everything adds weight and fatigue.
If you're new, start basic. Build up over time. Every piece you add must earn its place.
Use shock cord or zip ties to manage slack. Loose wires and straps snag gear, doors, or debris.
Redemption Tactical has worked with teams that carry only what’s proven. Every ounce counts when it’s real.
Testing & Evaluating Your Combo Kit
Test your setup like you fight. Empty testing is useless.
Load your full gear. Plates, mags, water. Do a run. Drop prone. Shoulder your rifle. Jump a curb. If anything shifts, fix it.
Record yourself doing common motions:
-
Weapon draw
-
Sprint
-
Transitions
-
Climbing over obstacles
-
Crawling
Watch for bounce, drag, or blockages. Small problems get worse fast.
Set up a stress course. 100-yard sprint. 10 burpees. Reload from prone. Drag a sandbag. If your helmet shifts or your pack pulls you backward—rework it.
Field testing builds confidence. The gear should feel natural. Like part of you.
Keep a checklist. Make one change at a time. Log what works. Track hot spots, fatigue points, loose straps.
A solid plate carrier + helmet + backpack combo gets better with use. Each rep refines it.
Maintenance & Loadout Optimization
Gear needs care. Even the best kit wears down.
After every mission or range day:
-
Remove plates and wipe the carrier clean
-
Inspect buckles, Velcro, straps
-
Check for frayed stitching or gunk buildup
-
Hang-dry everything—avoid high heat
Helmets need liner checks. Foam degrades. Straps stretch. Replace as needed.
Wipe down NVG mounts and metal parts with a soft cloth. Avoid oil near Velcro.
Backpacks should be emptied and checked weekly. No food. No mold. Secure loose webbing.
Review loadout every 30 days. Strip unused items. Shift pouch placement if your body changes.
Optimize for balance, not looks. Function comes first. Looks follow performance.
FAQ (Frequently Asked Questions)
Q1: Can I wear a backpack over my plate carrier?
A: Yes, if the straps don’t interfere. For better fit, use direct-attach systems or slim shoulder harnesses.
Q2: How tight should my helmet be?
Snug enough to stay stable when you shake your head, but not painful. Dial it in until it moves with you.
Q3: Are quick-release systems worth it?
For law enforcement or combat—yes. They help with fast removal in medical or water scenarios.
Q4: What weight is too much for a full loadout?
Over 45 lbs total (with armor and gear) becomes hard to sustain during high activity. Lighter is better if you can keep essentials.
Q5: What’s the best way to layer a full kit?
Carrier first, then helmet, then backpack. Test the sequence before the mission.